
الفاتورة المستحقة هي مستند المورد الذي تقيّدون به المشتريات أو الخدمات وما يترتب عليها من ضريبة مدخلات: تُنشئ التزاماً تجاه المورد وتربط الإنفاق بدليل الحسابات ومشاريعكم قبل تسجيل دفع المورد.
قد تأتي بعد أمر شراء واستلام، أو مباشرة من فاتورة مورد؛ المهم أن تبقى الشروط والبنود والضريبة متوافقة مع الوثائق المؤسسية ومطابقتها قبل الصرف. قائمة الأسفل تعيد خطوات إنشاء فاتورة مستلمة كما في دليل الترحيب مع صياغة المشتريات والمورد.
إنشاء فاتورة مستلمة
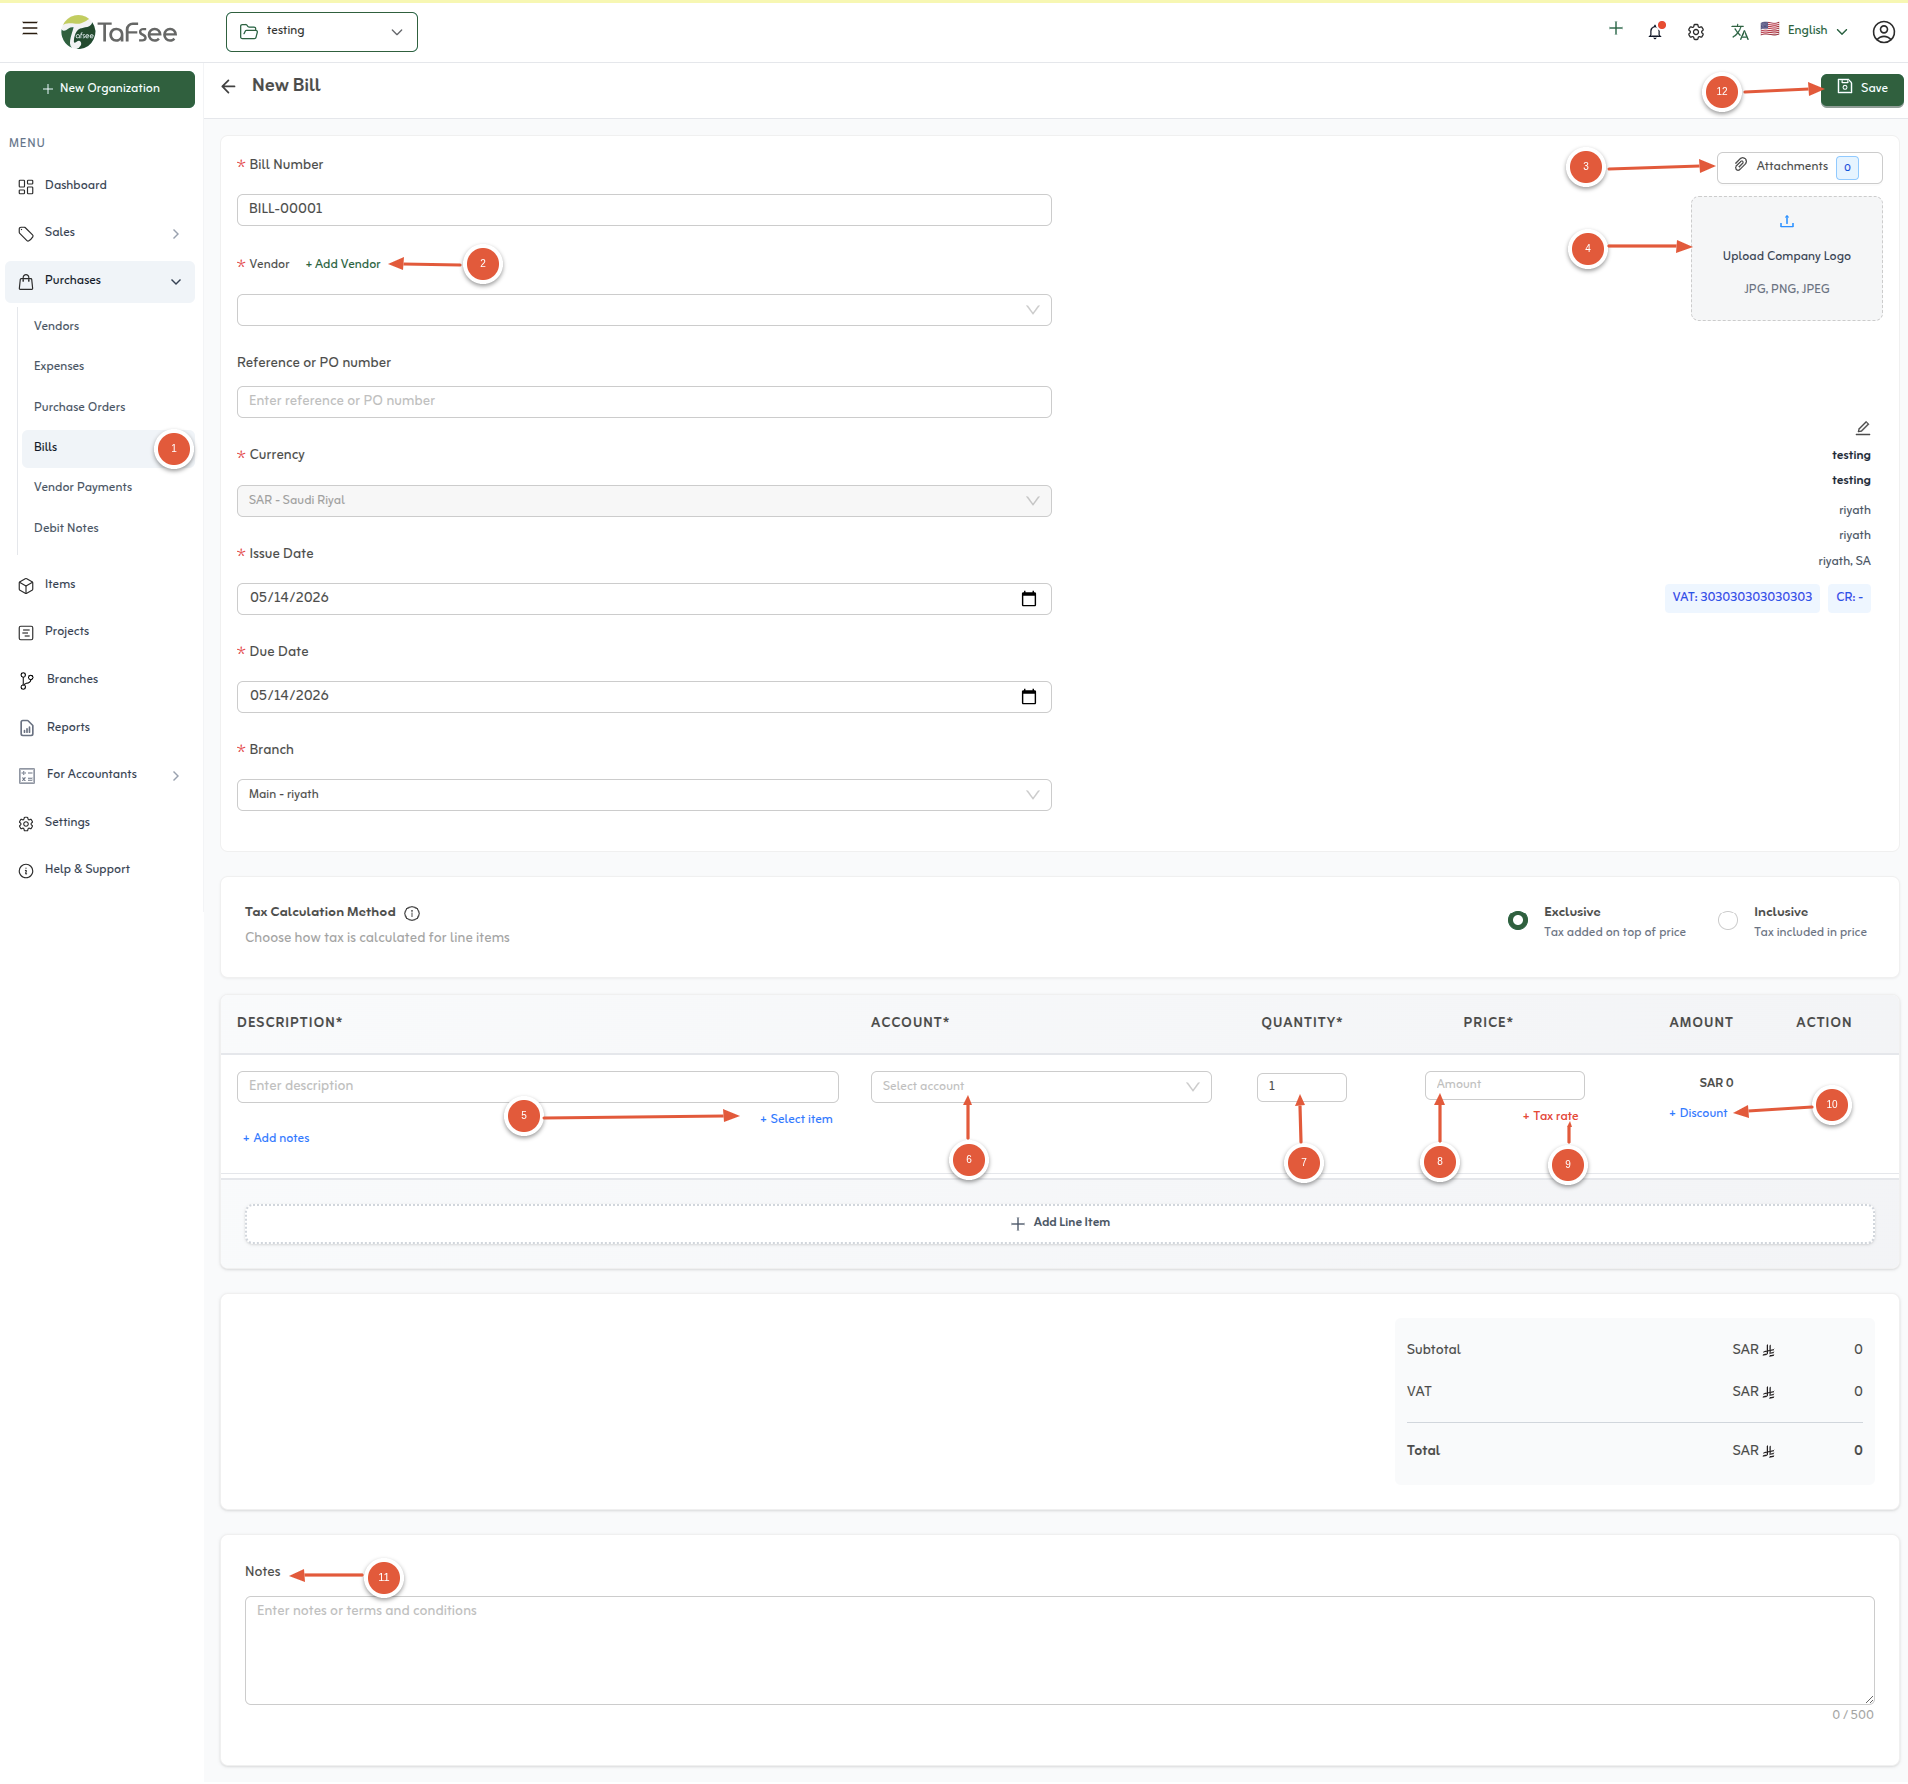
الخطوات نفس روح دليل الترحيب؛ استخدموا لقطة الشاشة كمرجع بصري لنموذج الفاتورة المستلمة.
- انتقل إلى المشتريات، ثم اختر الفواتير المستلمة لإنشاء فاتورة مورد جديدة.
- حدد المورد الذي صدرت عنه الفاتورة المستلمة.
- أضف مرفقاً عند الحاجة إلى ملف المورد أو مستندات داعمة.
- ارفع شعار مؤسستك إذا كان يجب أن يظهر الهوية على ملف PDF.
- أضف بنود السطور في قسم العناصر (أصناف من الكتالوج أو تفاصيل تُدخل يدوياً).
- اختر حساب المصروف أو نوع الحساب لكل سطر عندما يتطلب ذلك دليل الحسابات.
- حدد الكمية لكل سطر.
- حدد سعر الوحدة لكل سطر.
- اختر معاملة الضريبة لكل سطر—ضريبة القيمة المضافة على المشتريات، معدل صفري، معفى، أو خارج النطاق—حسب التوريد.
- طبّق خصماً على السطر بنسبة أو مبلغ ثابت.
- أضف ملاحظات يجب أن تظهر على الفاتورة أو تبقى للمرجعة الداخلية.
- احفظ الفاتورة لتسجيل الذمة الدائنة أو أبقها مسودة وفق مسار عملكم.
تعديل فاتورة مستلمة
طالما الفاتورة في حالة تسمح بالتعديل (غالباً مسودة أو لم يُسدد منها المبلغ بالكامل)، افتحها من قائمة الفواتير المستلمة وعدّلوا البنود أو الضريبة أو المرفقات ثم احفظوا. القيود بعد اعتماد أو مطابقة خارجية أو بعد بدء دفع المورد تعتمد على صلاحياتكم وسياسة مؤسستكم.
إذا اختلفت المبالغ عن أمر الشراء أو الاستلام، وثّقوا التصحيح في الملاحظات أو عبر إشعار مدين من المورد حتى يبقى مسار الشراء→الاستحقاق→الدفع واضحاً للمراجعة.
مسار الفاتورة المستلمة المعتاد
- الالتزام: إنشاء أمر شراء عند الحاجة إلى موافقة توثيقية أو مطابقة لاحقة.
- الاستلام: استلام البضاعة أو الخدمة ومقارنة الكميات مع أمر الشراء عند تفعيل ذلك.
- الفاتورة المستلمة: تسجيل فاتورة المورد، ربط البنود بالمشروع أو الحساب، وضبط ضريبة المشتريات.
- الموافقة والدفع: مراجعة داخلية ثم تسجيل دفع المورد لإغلاق الذمة وتحديث النقدية أو البنك.
متى تُستخدم الفاتورة المستحقة مباشرة؟
للفوترة المتكررة البسيطة أو الخدمات العاجلة خارج أمر الشراء، يمكن إنشاء فاتورة مستلمة مباشرة طالما سياسة مؤسستكم تسمح بذلك وما زال مسار الموافقة والمرفقات واضحاً.
عند تجاوز عتبات الإنفاق أو التعامل مع موردين حساسين، فضّلوا أوامر شراء وتوثيق المطابقات بحيث تبقى الفاتورة مستند استحقاق واحد يمكن الدفاع عنه قبل أي صرف.
نصائح سريعة
- طابقوا فاتورة المورد مع أمر الشراء والاستلام قبل الموافقة على الدفع.
- تحققوا من ضريبة المشتريات على كل سطر—الأخطاء تؤثر على الإقرار.
- للقوائم والدفع الجماعي، راجعوا دليل إدارة الفواتير المستحقة.